 We ship worldwide
 Top customer satisfaction!
 Many payment options


Unclockable Instructions
Step by step tucking guide
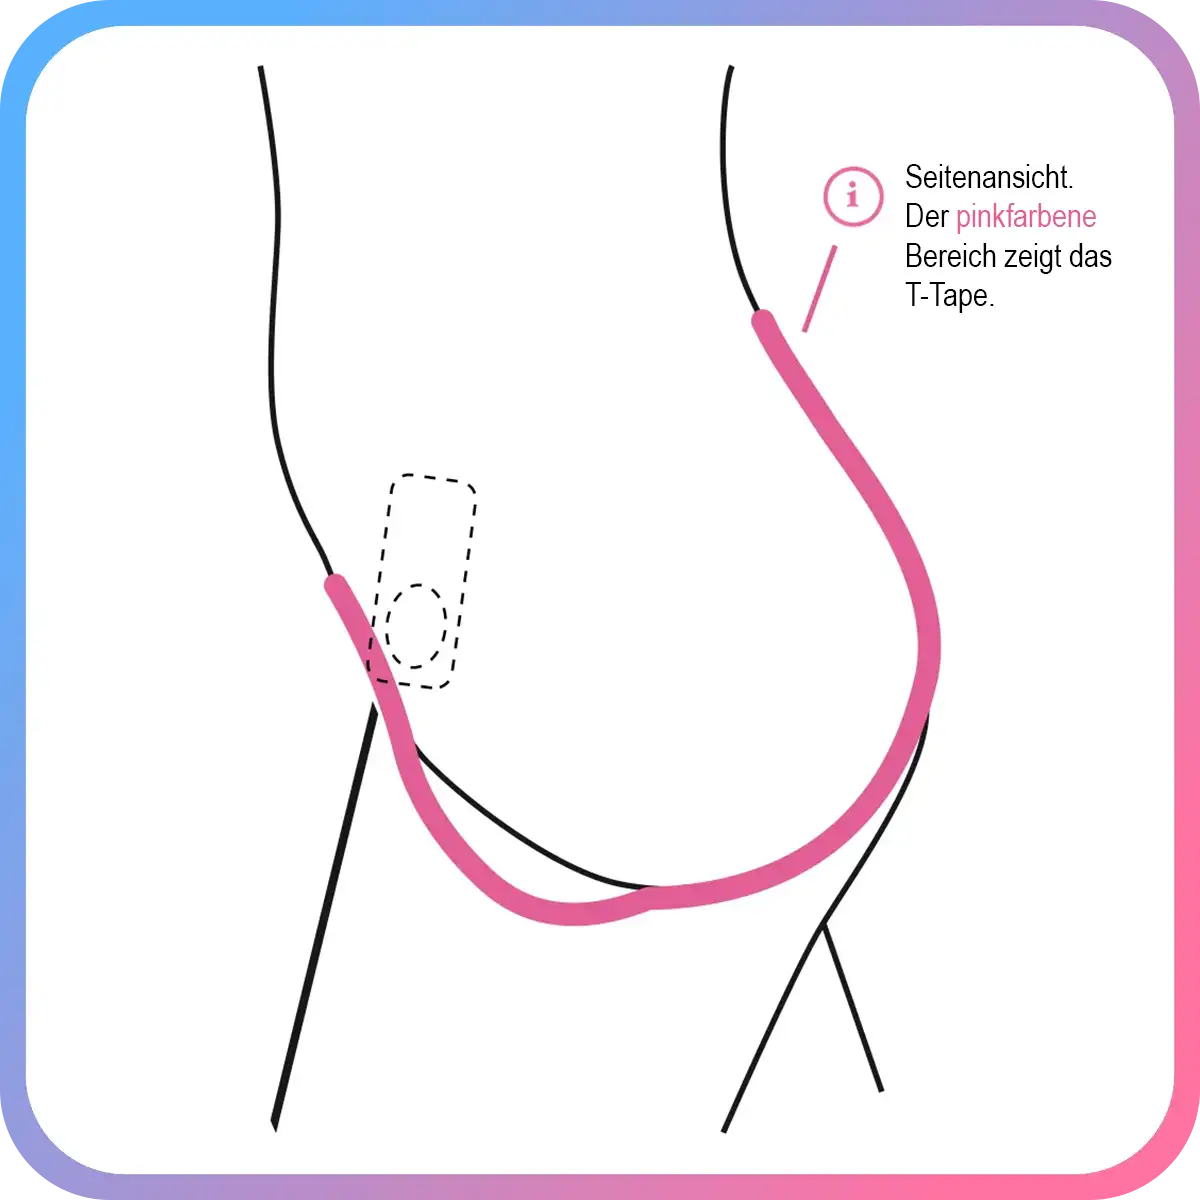
First: Let's talk fit
To get the best fit, you'll want to give some thought as to where on the front of your body you start when applying the T-Tape. Starting lower is better. Lower application in the front of the body will give you more material to work with as you pull it all back for a better fit that stays in place. Starting lower also ensures there is enough width in the front to hold a tuck in place. T-Tape measures 11.5 inches (29 cm) long right out of the box and stretches up to 180% to 21 inches (53,5 cm) total. It's a one-size solution designed for comfort.
Peel a little
Carefully peel away a small section of the wide end of the T-tape. The section you expose should be about two fingers in width. Keep the rest of the T-tape backing on. (If you peel the entire backing, it will be more difficult to apply.)
Apply a little
Apply to your upper pubic area (the mons) which is just about 1 inch (2.5 cm) above your... scepter. At this point the remaining tape should sort of be hanging from your body with the remainder of the tape’s paper backing intact.

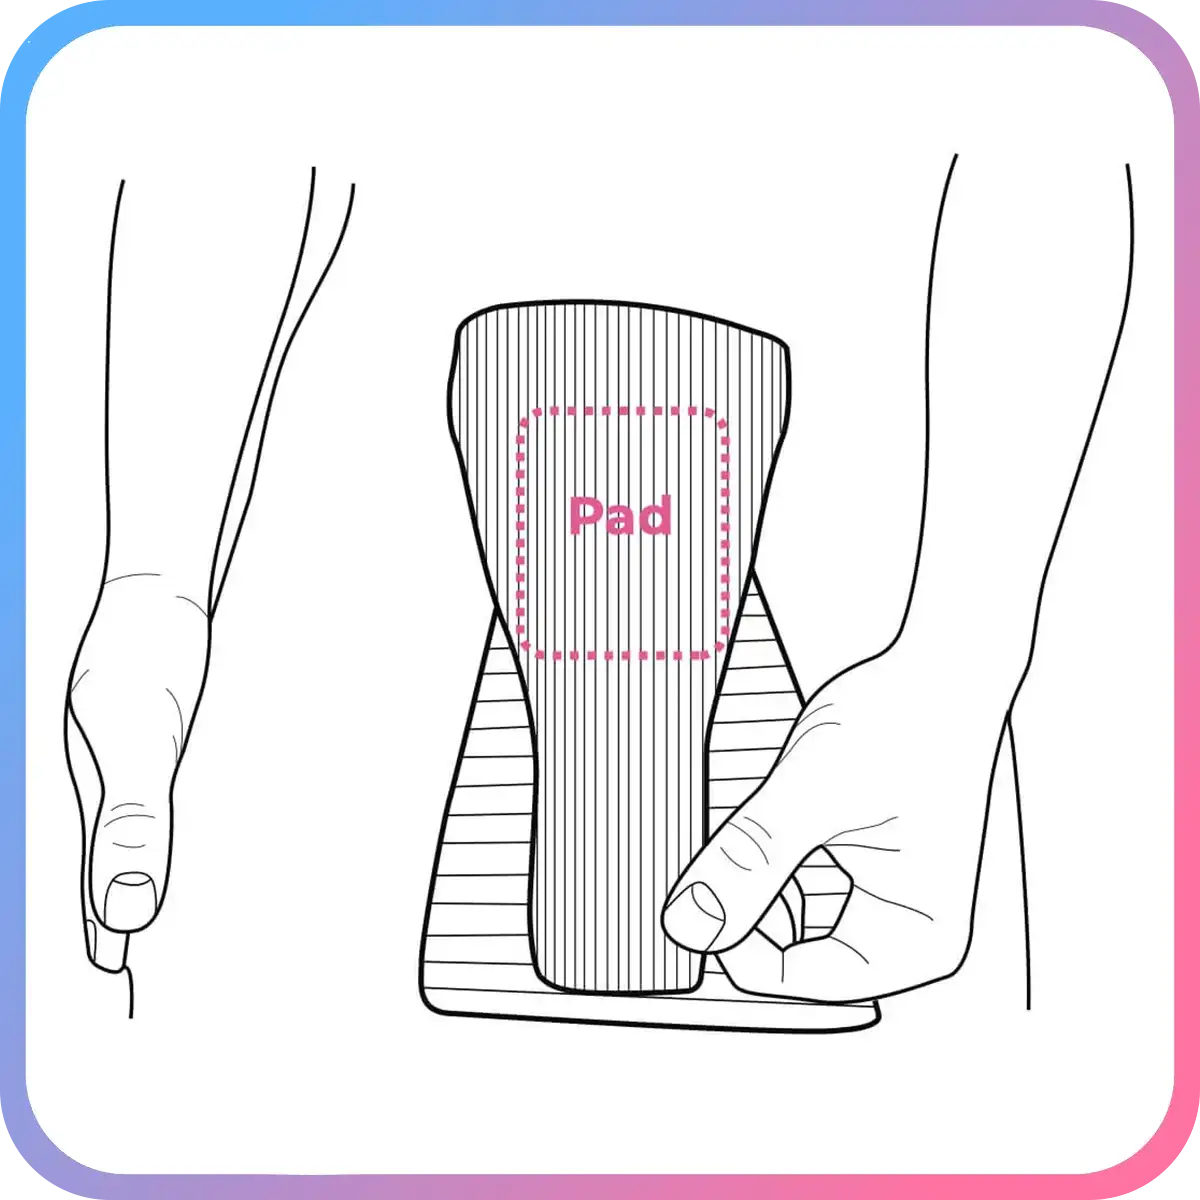
Add the pad
Position the included sterile cotton pad lengthwise as you peel slightly more of the paper backing. The pad should cover your scepter, protecting it from making contact with the tape adhesive. The end of the pad should line up with the base of your scepter.
Join pad and tape
Pull down the exposed section of T-Tape, joining it with the pad. Let the remaining paper backing hang down. Don't remove the rest of the paper just yet... We know it's tempting.
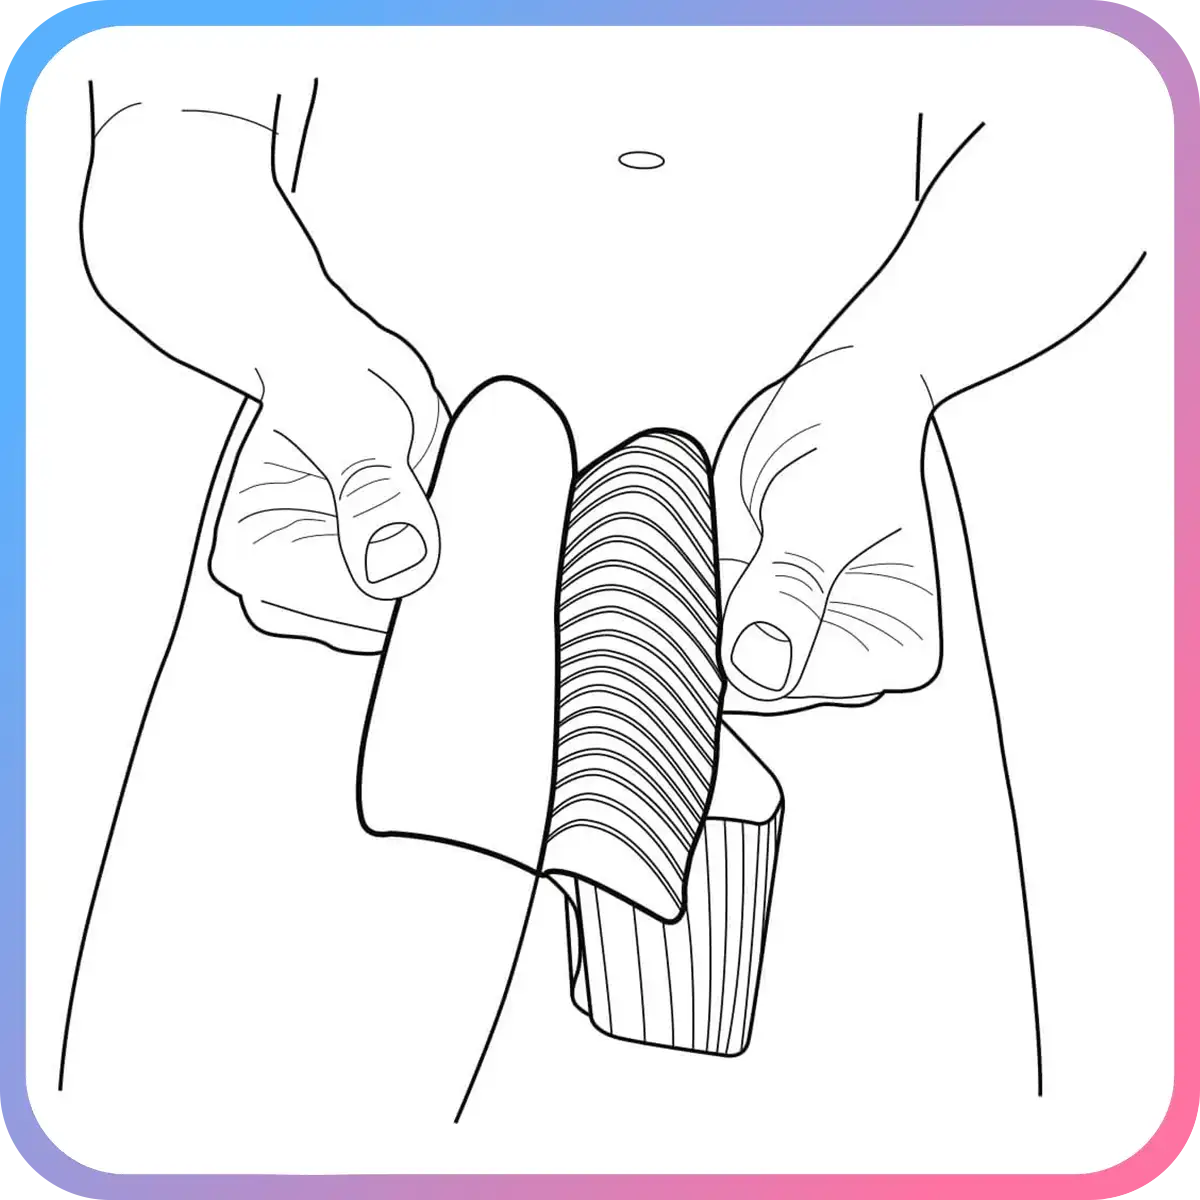
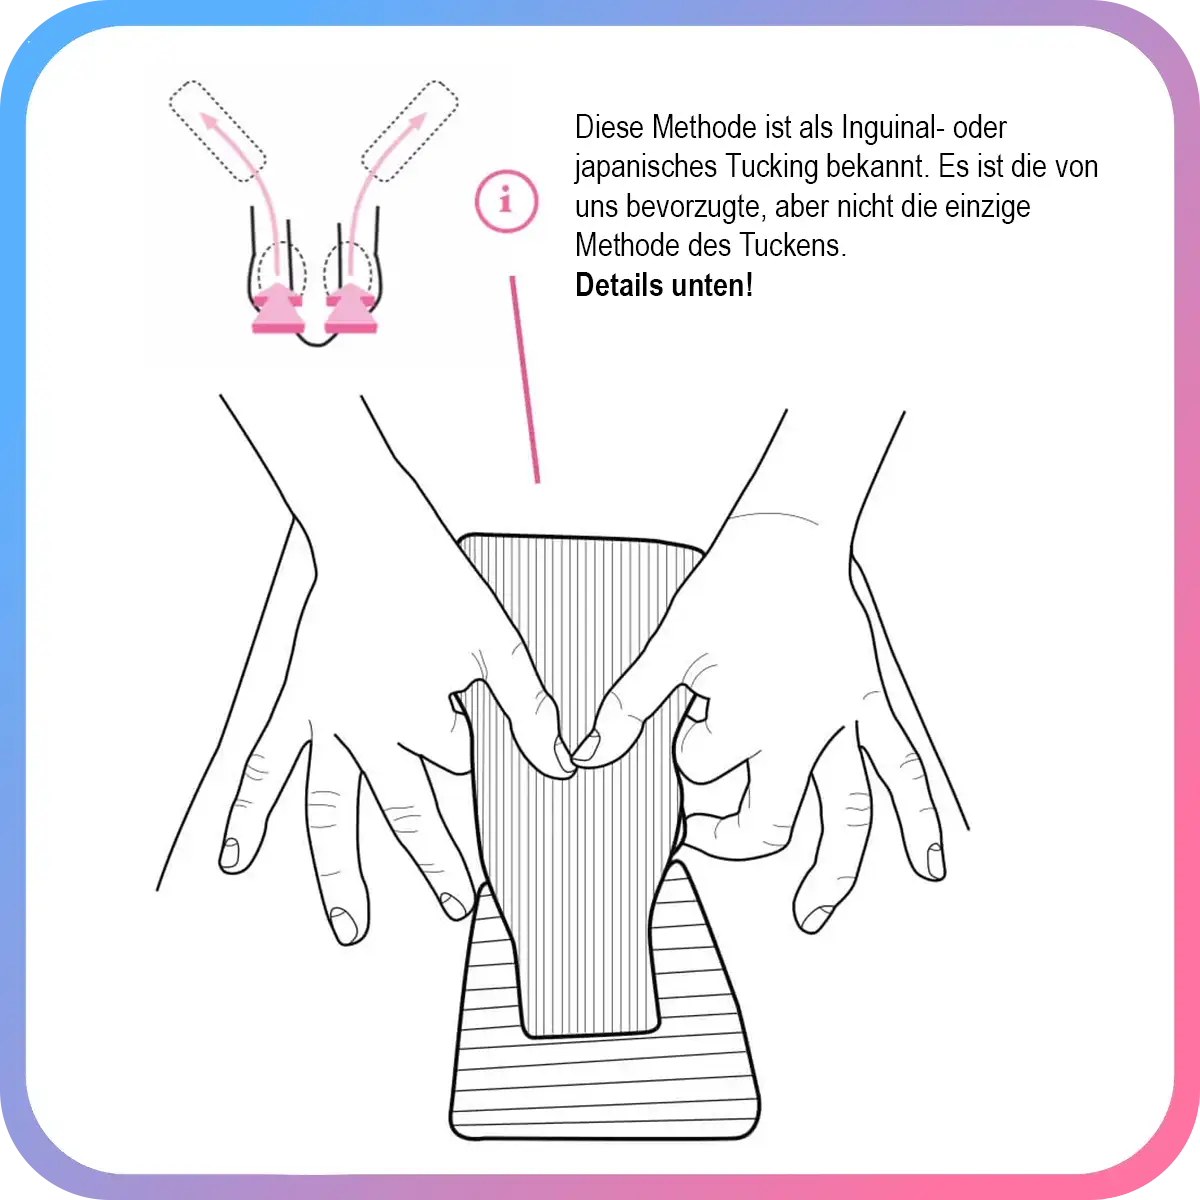
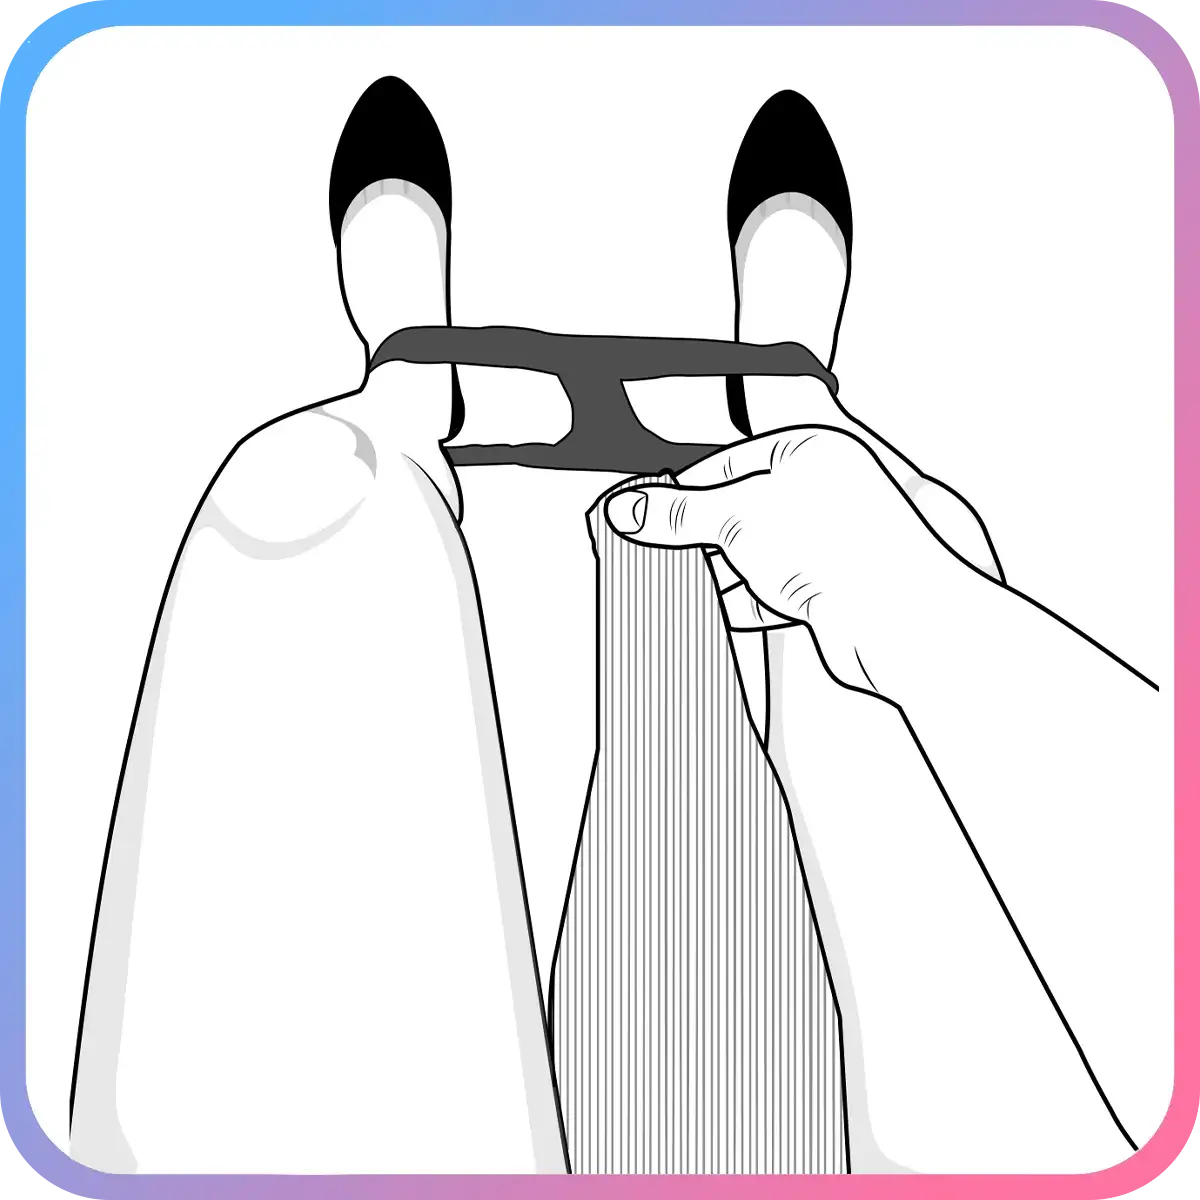
Going up!
Time to push the scepter back, and the gemini twins back up inside of something called the inguinal canal. This is where they were before they "dropped" in puberty. With your index fingers, locate the twins and begin pushing them toward your backside. The next step takes practice: gently push them back and up, curling your fingers inward toward you as you do.
Details:
The key to not having the twins come down during this step is to push them in, up and back (that's toward you) with your index fingers working behind the T-tape as shown. While this is happening, you want to be pushing down onto the area with your thumbs, also shown above. During this process, your thumbs are applying gentle pressure in a downward motion, toward you, from the outside of the product. So recapping: your index figures send the twins upstairs, but it's the thumbs that keep everything in place once you've retracted your index fingers out from behind the tape. With some practice, this becomes one fluid motion. This isn't as hard as it sounds, so don't be intimidated! You got this.
Ps. If you do plan on starting HRT (Hormone Replacement Therapy), the size of things down there will reduce and make tucking even easier ?️⚧️
For those of you learning how to tuck for drag, rest assured: patience & practice make perfect!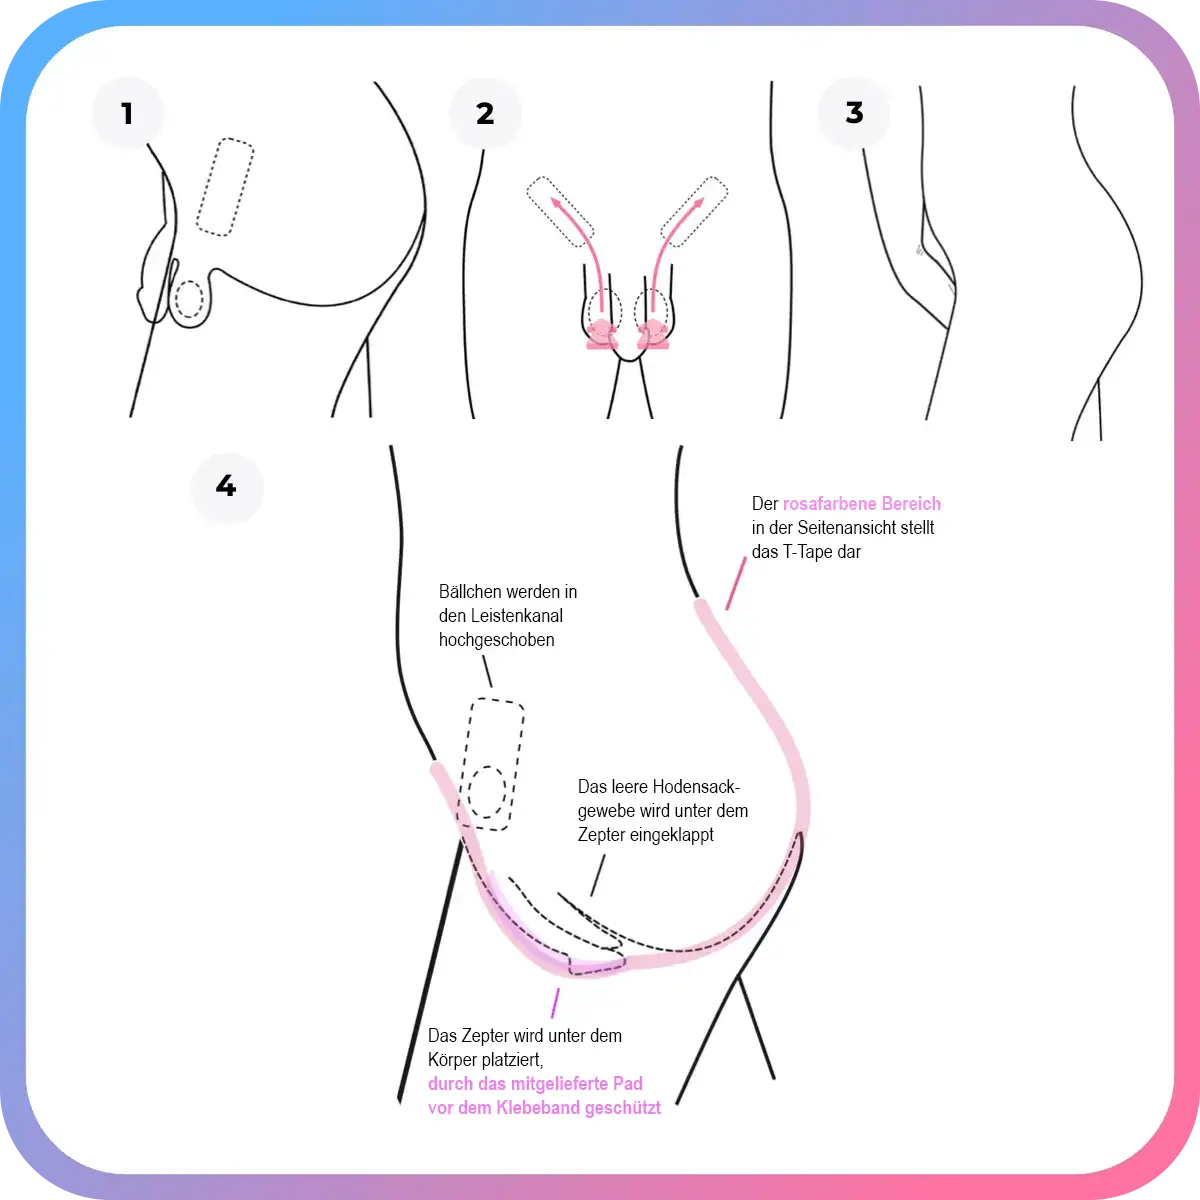
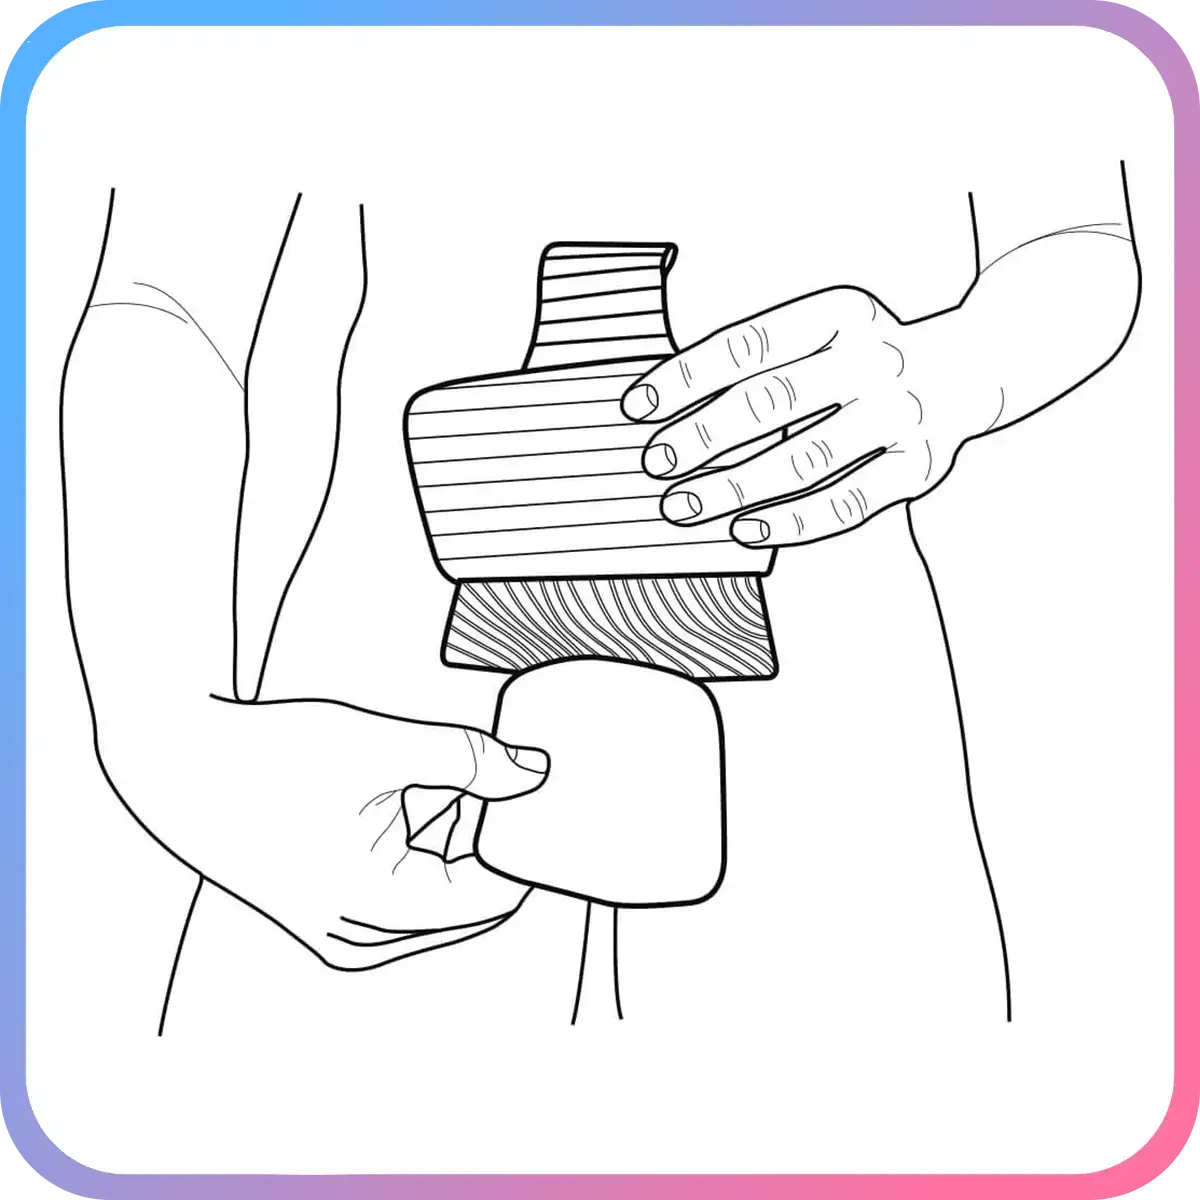
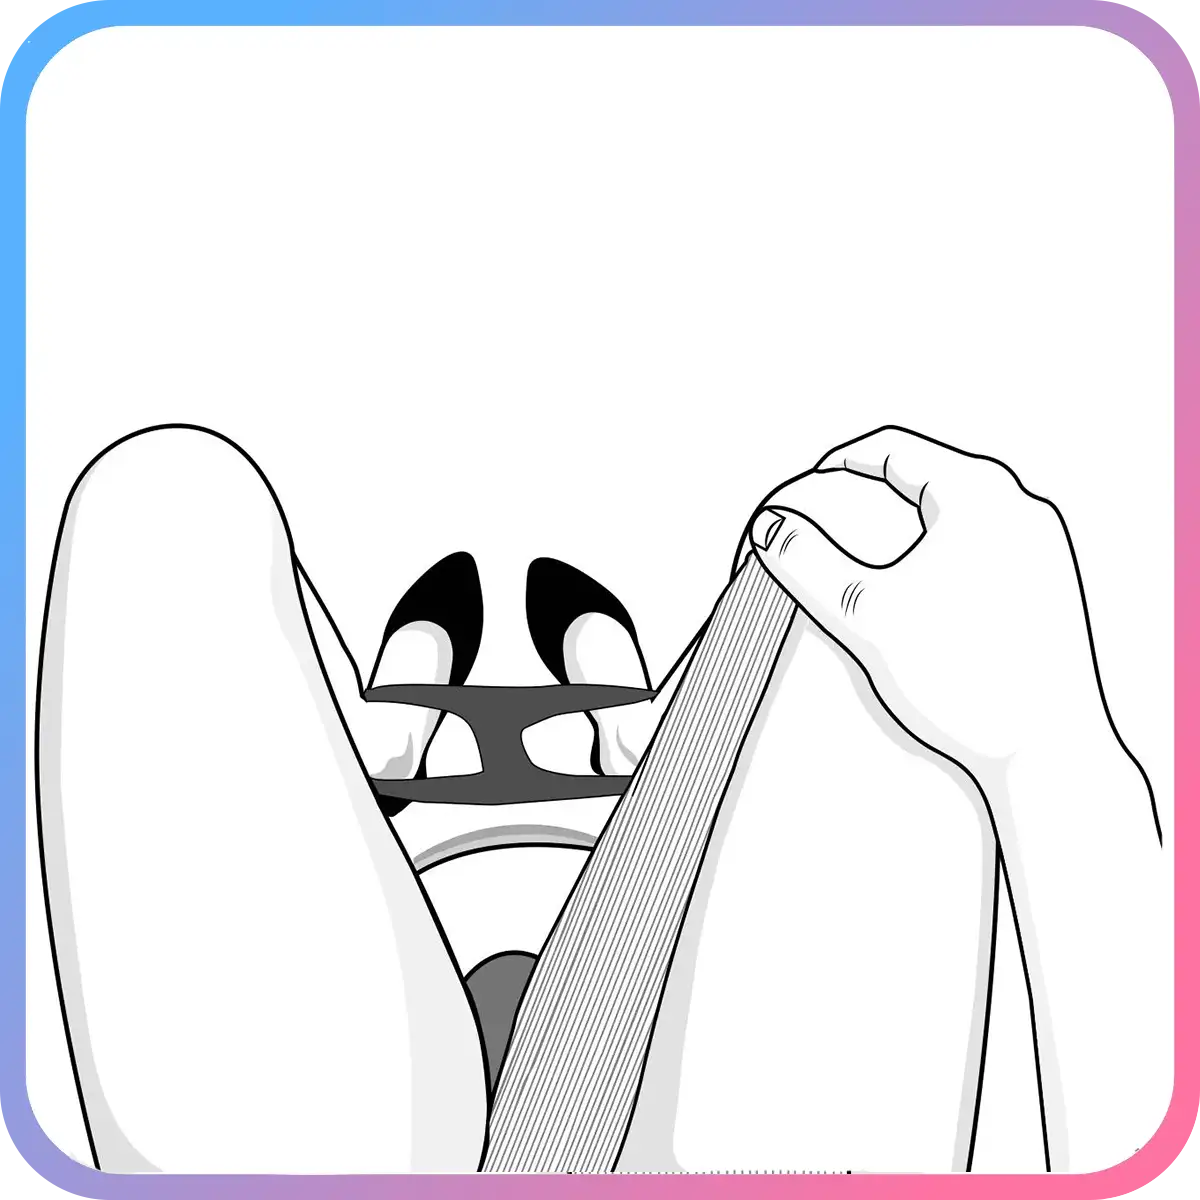
This is called the Japanese tucking method, and it involves lifting the twins into the inguinal canals. Using this method will hide them completely and is recommended for the flattest appearance. Remember to gently shift them upward and into each socket. Guide them slowly. Do not use hard pressure, and stop tucking if you experience pain. The very first time you try this, it can help to take a cool bath or shower before to make the process easier. The twins naturally ascend toward the inguinal canals when they're exposed to cold temperatures. When the process is complete, your scepter will be back and under your perineum and the twins will be in their canal, inside your lower abdomen. Hold everything in place by applying pressure with your thumbs as shown.
Note: If you're having trouble with this technique, it may help (despite all this talk about cold) to first take a warm bath, allowing the twins to drop away from your body. Use this time to explore the area, pushing inward in the empty space with your fingers. This will give you an idea of the interior topology, if you will, that you have there. Remember: not all trans bodies are the same, so if you have difficulty with this method, feel free to tuck in a way that works for you! Many of our our customers say they're able to get a great tuck, even without using the Japanese method.
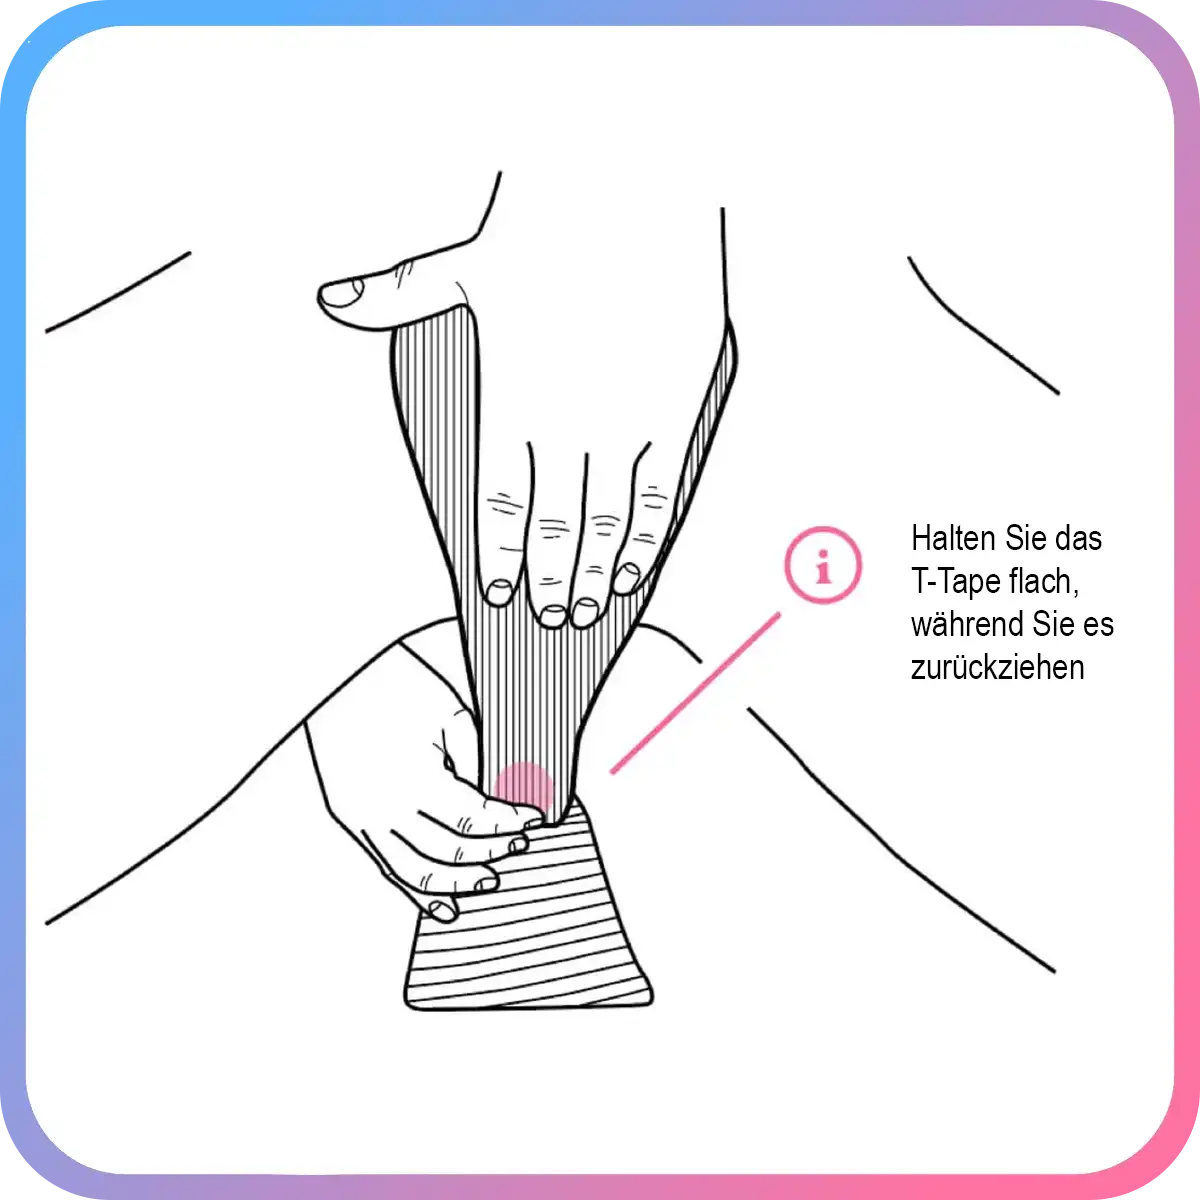
Pull it back
Move into a squat, and reach your dominant hand down behind your backside, under your body. Grab the small end of the tape, and then pull it straight back, stretching it up slightly and behind your back.
Lastly...
Stretch the tape back up and over your backside, removing the last of the paper backing as you do. Apply the T-Tape flat along the edges of your buttocks (no wedgies!), ending at just about the small of your back.

You did it! ✨

Bathroom breaks
Reaching behind your body with your dominant hand, carefully pull away a small portion of the end of the product. You want to pull that down slowly, under your body. As you do this, make sure you gently stretch the product to keep it flat. This will also prevent it from sticking to itself. Next, pass the product to your other hand, in front of your body. Now you're ready to sit down and do your thing. As you do, you may want to temporarily hold the product along your leg, as shown below. This will keep the product flat, clean, and ready for re-application! Most find they can re-apply the same strip at least once, and up to 3 times before needing to replace.
Post-Restroom Re-application Tips:
1. Avoid touching the sticky side of the product as much as you can
2. Re-apply the tuck to the same area as your initial application. In addition, try to stretch it to about the same length as it was before, as you go up your backside. This will ensure that the tuck bonds well as it sticks to any of the left-behind adhesive which may still be on the skin
3. Hold the product in place for 10-20 seconds, rubbing gently but firmly to activate the adhesive. Do this specifically on the part of the product that goes on your lower back and backside
4. To make the restroom re-tuck as risk-free as possible, wear underwear over your tuck when you can. This will ensure the tuck has some tension pressing it up against your body, even after you finish reapplying
Finally, follow the golden rules of a secure tuck: 1) no moisturizers or body lotions down there, as they will weaken the adhesive. 2) If you have to go without underwear for an outfit, or if you have any doubts, fold a spare kit into your handbag or purse. If you have any questions or concerns, email us and we will help you out.
One more thing...

Looking for that crease in the center? This isn't photoshop: you can get these results.
Here's how...
The best way to get the crease as shown is through a combination of two techniques:
1. When pulling back the tuck from behind, during the final steps, see if you can position your thumb so that it is directly in the center of the end of the tape. This will help ensure that section receives a bit of extra tension. With practice, this will start the tuck to crease in the middle.
◦ Be sure to apply the tuck while in a slight squat. The act of standing after you apply the back section with promote the crease in the fabric.
2. Once you're holding the end in the way described in step 1, see if you can gently pull back the tuck so that it is tighter than usual. This will accentuate the crease effect
This takes some time to master, so be patient with yourself.
We're with you every step of the way! Email or chat with us at hello@unclockable.com!